
DLG GROUP · INSIGHTS / RENOVATION
Plan the kitchen before choosing the finishes
Start with tasks, layout and the existing room before selecting finishes. Work through cabinets, worktops, quantities, service access and junctions as one coordinated scope.
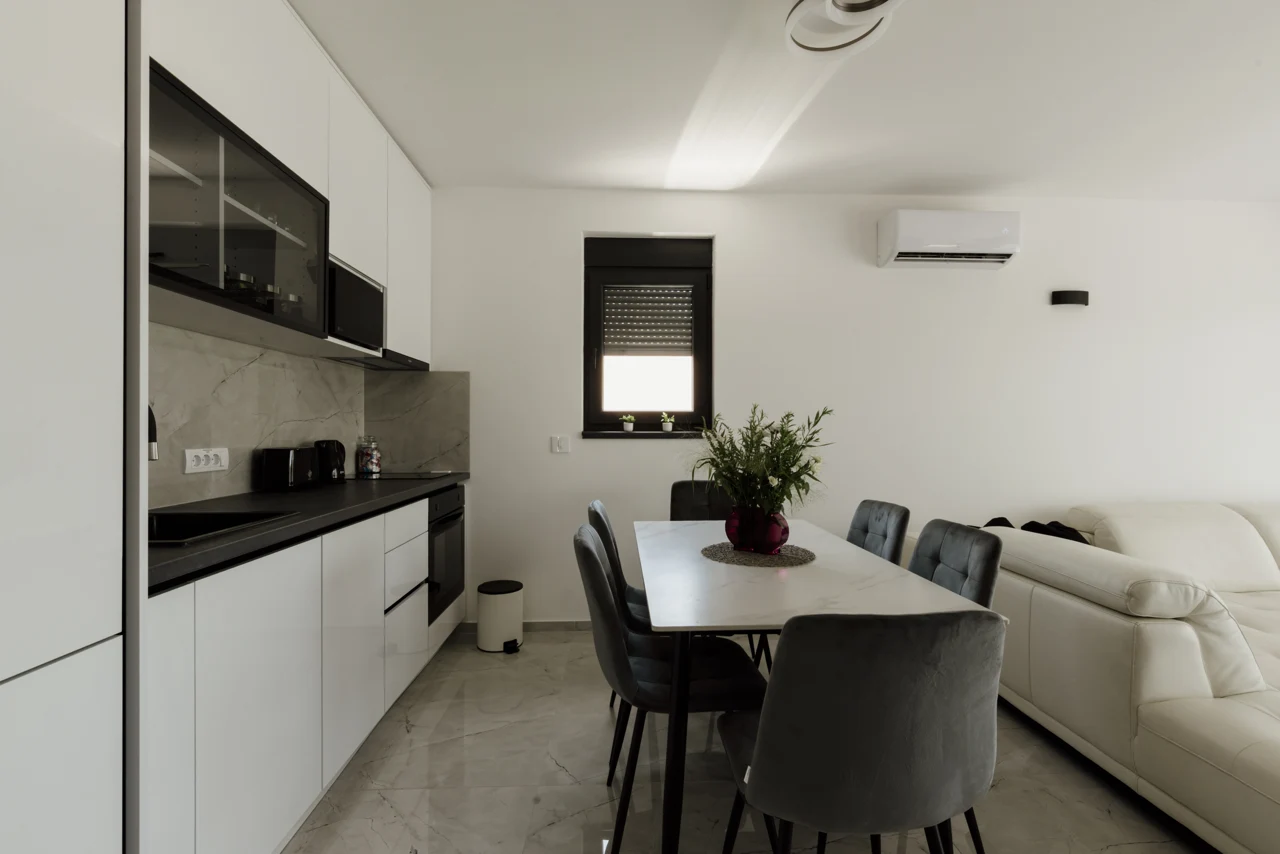
ACTUAL PHOTOGRAPH / REFERENCE
Read the kitchen beyond its finish
A photographed kitchen and dining area brings the cabinet run, worktop, wall finish and circulation into the same view. The photograph does not identify the worktop material, clearances, concealed supports or extraction route.
- Worktop joint: Look where the backsplash meets the worktop. Check accessible joints for gaps or deterioration.
- Cooking zone: Look above the cooktop. Ask what captures cooking air and where it goes.
- Walkway: Try the route with nearby cabinet and appliance doors open, with permission.
Open the home showing checklist.
Planning a remodel? Decide what to keep, repair or reuse.
Ask: Can the proposal show door movements, preparation space, worktop junctions and appliance access on the measured plan?
Photo source & use
Shixart1985 · 2026-07-04. Wikimedia Commons source record · CC BY 2.0. EXIF orientation, resized and WebP encoded; no retouching or crop. Checked 27 October 2026. Not a DLG project, endorsement or installation approval. Photo adaptations retain the stated source licence.

Home showing / renovation checklist
What did the kitchen remodel actually change?
Use the annotated photograph to spot three places to look. Then ask what the work included beyond the visible finishes.
01 / Look under the sink
With permission, look for swelling or staining in the base cabinet and locate the shutoffs. Ask whether the sink and plumbing were replaced or relocated. Visible marks are a reason to ask about leaks and repairs.
02 / Follow the cooking air
Ask for the hood model and whether it exhausts outdoors or recirculates into the room. If the seller says it vents outside, ask where it terminates or request a duct photo. The model may support more than one installation mode.
03 / Try the layout
With permission, open the dishwasher and the nearest drawer or door one at a time, then check for conflicts. See whether there is room to pass and a place to set items down by the sink or cooktop.
04 / Ask for the work scope
Request the dated scope, available invoices, warranties and any applicable permit or inspection records. Ask which plumbing, wiring or ductwork was changed. Mark concealed work without supporting records as unverified.
Explore sink and service details · Compare ventilation layouts · Building America Solution Center: kitchen exhaust
Optional architectural concept illustrations
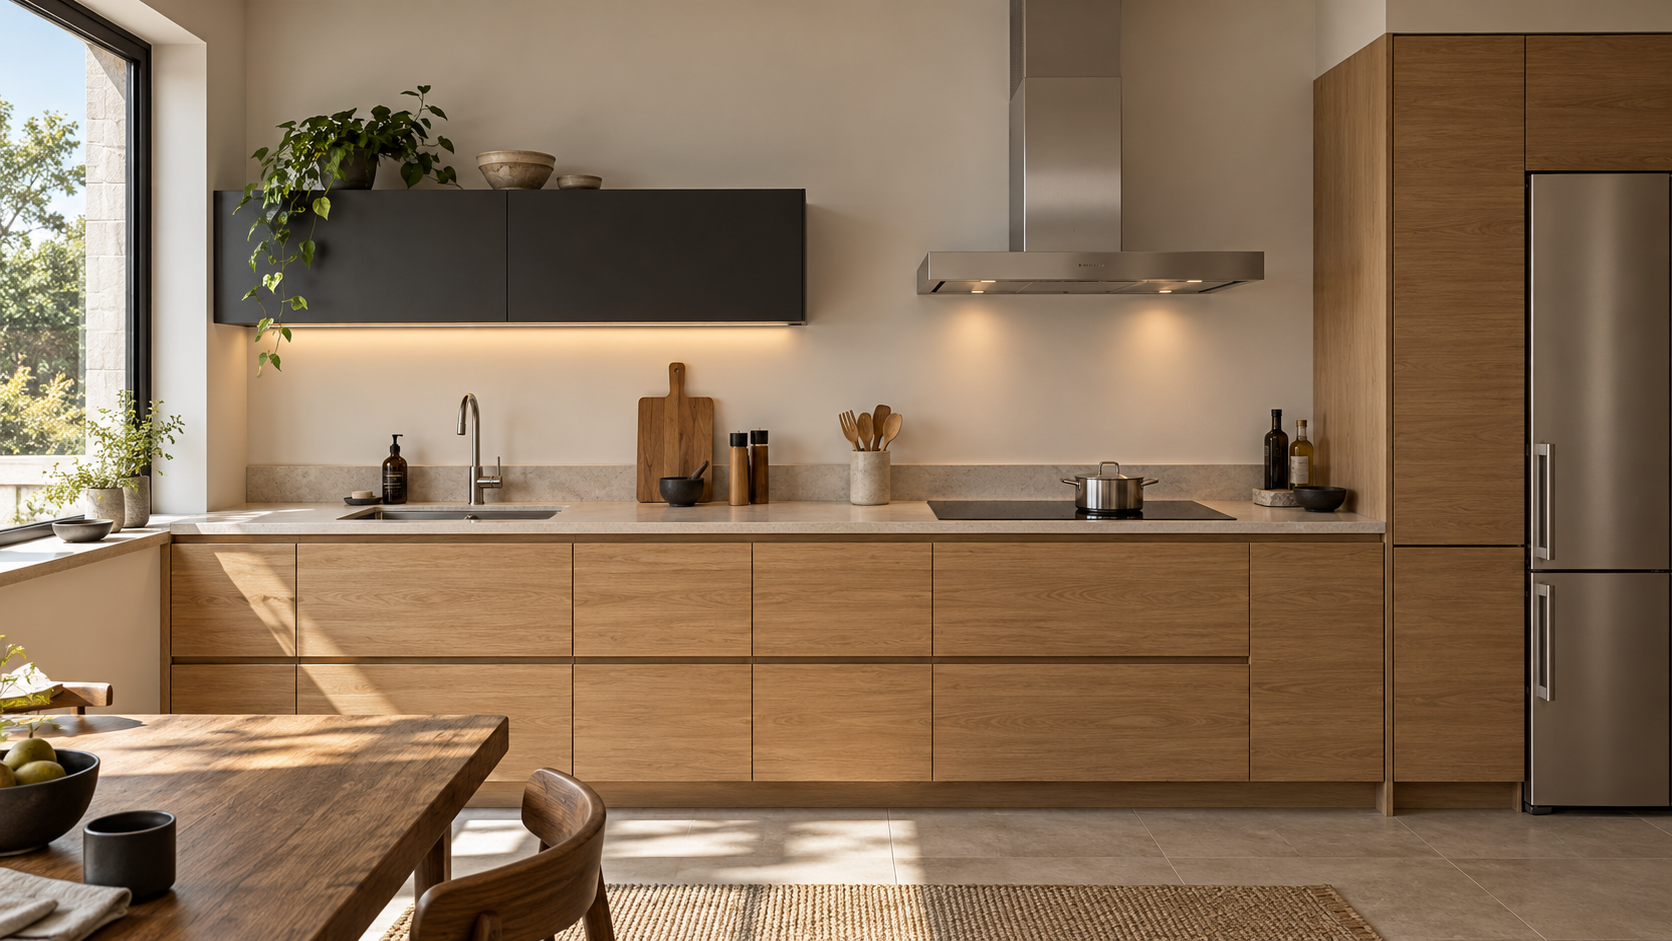
01 / Brief, tasks & cabinetryScope, measured layout and cabinet construction.
A kitchen proposal becomes easier to assess when it describes how the room will work, what the construction includes and what needs checking before the finishes are installed.
This guide combines public indoor-air guidance, manufacturer care information and DLG planning questions. It covers a residential renovation conversation: layout, cabinets, worktops, water, appliances, ventilation and handover. The material examples help you ask for evidence; they are not a brand ranking or a project specification.
1. Write the brief in three columns
Start with the existing room, rather than a cabinet catalogue. Record what works, what is inconvenient and what is still unknown.
| Retain | Replace | Investigate |
|---|---|---|
| Items intended to stay, with their condition recorded | Items included in the proposed work | Conditions requiring inspection or confirmation |
| Example: an appliance that still meets the brief | Example: cabinet fronts, if the underlying system is suitable | Example: staining below a sink or an uncertain exhaust route |
The columns prevent an unresolved condition from quietly becoming an assumed inclusion. Ask each bidder to distinguish a confirmed item, an allowance and a possible variation. Use the same brief for every quotation.
Detail to notice: A finish schedule records selections. It does not replace a scope describing preparation, installation and responsibility.
2. Test the layout through real tasks
Map a normal sequence: unpack groceries, store them, wash ingredients, prepare food, cook, serve and clear up. Then test what happens when two people use the room or when the dishwasher is open.
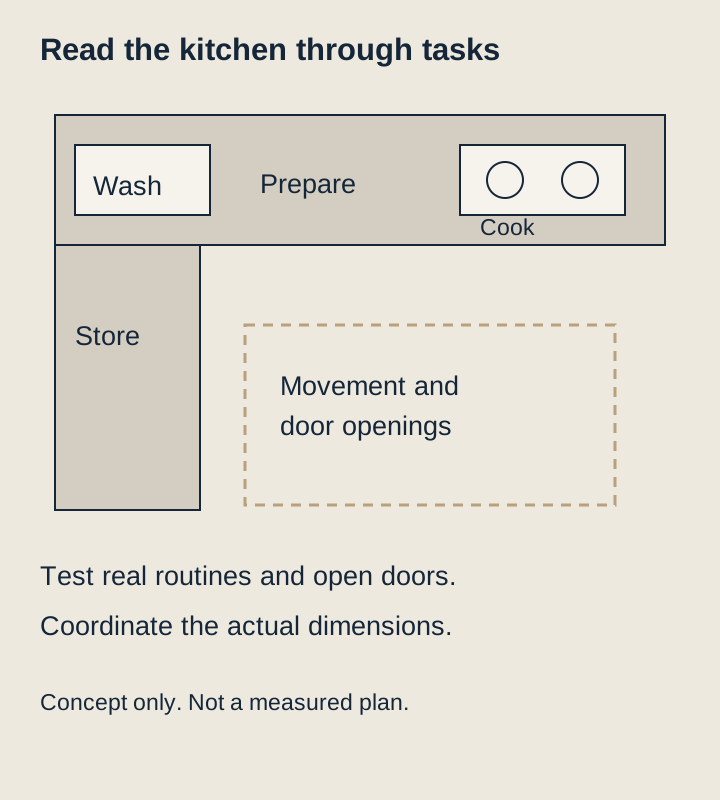
Use the plan to ask:
- Where can groceries be put down before storage?
- Is there a useful preparation surface where it is needed?
- What happens when cabinet, refrigerator and dishwasher doors are open?
- Can frequently used items be reached without moving several other items?
- Where will small appliances be used and stored?
- Which appliances and service points need access after completion?
These are DLG usability prompts. This guide does not prescribe a universal work triangle or a clearance dimension. Ask the designer to show the relevant dimensions and explain the basis for them in the actual project.
3. Specify the cabinet as an assembly
“Oak kitchen” may describe only the visible front or veneer. Request a separate description of the cabinet body, fronts, edges, back panels, hardware and fixings.
| Part | Record in the selection schedule | Question to resolve |
|---|---|---|
| Cabinet body | Panel material, grade, thickness and finish | What is specified around water exposure and at cut edges? |
| Door and drawer fronts | Core, surface finish, edge treatment and handles | Can a damaged front be repaired or replaced? |
| Drawer runners and hinges | Exact hardware range and adjustment information | What use limits and servicing instructions apply? |
| Supports and wall fixings | The selected cabinet system and the actual supporting construction | Who confirms the fixing method for this wall or floor? |
| Fillers, end panels and plinths | Locations, finish and access arrangements | Can doors open fully and serviceable items be reached? |
Plywood, MDF and particleboard are material descriptions, not complete performance specifications. Instead of assuming that one name settles quality, ask for the actual product information and construction details. This table identifies evidence to request; it does not assign unsourced durability scores.
IKEA’s installation guidance, for example, calls for checking the room and wall support and using fixings appropriate to the wall material. It also explains the role of fillers in allowing doors and drawers to open. [K01] Its rail heights and installation details belong to that system and market; they are not universal dimensions for every kitchen.
02 / Worktops, backsplash & wet zoneMaterial comparisons, quantity drawings, real interfaces and service access.
4. Compare worktops through use and care
Separate appearance from the conditions you will expose the worktop to: heat, water, cleaning products, cut edges and the proposed sink or appliance cut-outs.
| Option | Evidence-based consideration | Ask the supplier or fabricator |
|---|---|---|
| Laminate | Formica cautions against excess water around seams because it can reach the substrate and cause swelling. [K02] | How are seams, edges and cut-outs detailed for this exact product? |
| Quartz or mineral composite | Caesarstone’s Canadian care guidance calls for heat protection and cutting boards. [K03] | Which care sheet covers this exact product and finish in the purchase market? |
| Natural stone | The Natural Stone Institute links care to stone composition and notes that acidic cleaners can affect calcium-carbonate-based stone. [K04] | Which stone is supplied, what care is appropriate and is an impregnating treatment recommended? |
| Porcelain or other slab products | Treat the selected product as its own specification; this guide does not claim a generic heat or impact rating | What are its support, edge, cut-out, handling and repair requirements? |
A useful comparison: Two samples may look similar while their care instructions differ. Obtain the instructions before ordering, and ask whether the proposed edge and finish change any requirements.
A countertop quote should also identify templating, fabrication, seams, cut-outs, delivery and installation responsibilities. Request a drawing of the proposed seam positions and exposed edges. Do not assume every worktop option has the same repair method or installation allowance.
Backsplash, wall and worktop: read the junction
The main principle is to distinguish the exposed finish, what supports it and the junction with the worktop. A finished photograph does not identify the bonding materials or resolve the corner detail.
| Wall treatment | Principle to discuss | Detail to request |
|---|---|---|
| Ceramic or porcelain tile | Review tile, bonding layer, support and change of plane separately | Substrate/adhesive compatibility, exposed edges and worktop junction |
| Stone or other slab backsplash | Coordinate the exact slab with its support and adjoining worktop | Fabricator’s support, joint, edge and fixing details |
| Painted wall above a separate upstand | Identify the upstand, coating and their different roles | Coating suitability for the intended exposure, preparation and junctions |
LATICRETE’s movement-joint guidance identifies changes of plane and tile meeting countertops as locations requiring movement consideration. [K08] Schluter also offers purpose-designed countertop/backsplash profiles for particular conditions. [K09] Select the appropriate detail for the assembly rather than treating every junction as an ordinary field grout joint.
Read the movement limit. The U.S. DILEX-AHK page describes an aluminium cove profile for inside corners and countertop/backsplash transitions where only limited movement is expected. [K09] Its presence does not establish that a joint with greater movement has been designed. Ask the installer to identify the expected movement, selected profile and compatible adjoining materials in the proposal. Keep the visible cove detail separate from the concealed water-control assembly.
Concept study · Closer look: tiled backsplash and worktop junction
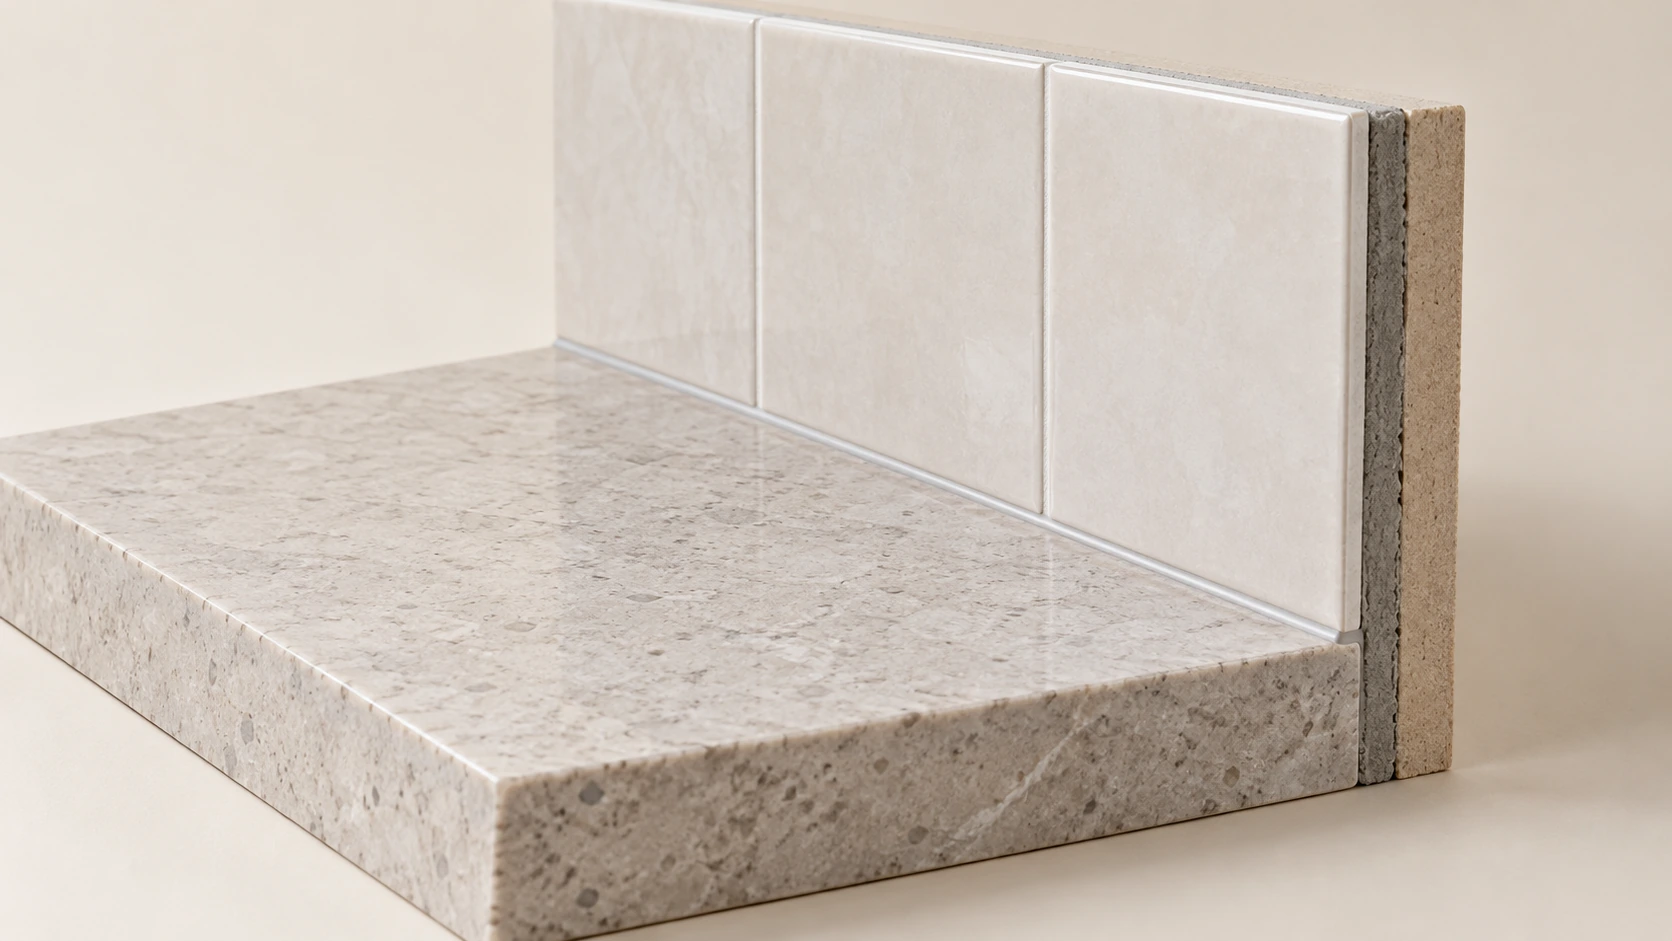
Ask which products form the support and bonding layers and which detail accommodates the junction. A surface joint alone does not establish the complete water-management performance of the wall.
4A. Work through a measured kitchen example
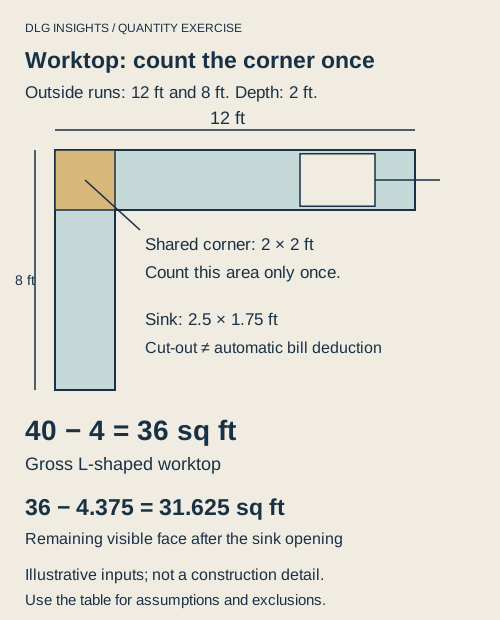
Use this original estimating exercise to understand what a fabricator is pricing. It is not an actual project or a slab-cutting plan. Assume an L-shaped worktop with outside runs of 12 ft and 8 ft, a constant depth of 2 ft and one shared 2 × 2 ft corner. The sink opening is assumed to be 2.5 × 1.75 ft.
| Quantity | Calculation | Result |
|---|---|---|
| Combined rectangles before corner correction | 12 × 2 + 8 × 2 | 40 sq ft |
| Shared corner counted twice | 2 × 2 | 4 sq ft |
| Gross L-shaped top | 40 − 4 | 36 sq ft |
| Illustrative sink opening | 2.5 × 1.75 | 4.375 sq ft |
| Remaining visible top face | 36 − 4.375 | 31.625 sq ft |
A sink cut-out does not automatically reduce the charged area by its opening size. Slab purchase, nesting, cutting, edge work, reinforcement where specified and transport describe different costs. Request the gross-area convention, slab allocation, seam layout, edge lengths and cut-out charges separately. The calculation above describes geometry, not the number of slabs to buy.
For a separate backsplash exercise, assume two measured wall runs totaling 20 ft, a tiled height of 1.5 ft and one 4 × 1.5 ft opening wholly within that band. Net face area is 20 × 1.5 − 4 × 1.5 = 24 sq ft. An assumed 10% cutting/spare allowance gives 26.4 sq ft before package rounding. The allowance is editorial; actual tile size, joint layout, returns and pattern can change it. Adhesive, grout and sealant quantities need their own product data and geometry.
This is why an offer based on “20 linear feet” cannot be compared directly with one based on “36 square feet.” Ask which surface, dimensions and excluded work each number represents.
Understand a real worktop junction specification
LATICRETE TDS 256 describes movement joints using flexible sealant and a backer rod or bond-breaker to avoid bonding the sealant on three sides. Its stated examples include tile meeting cabinets/countertops and changes of plane. [K08] The practical lesson is that the joint’s geometry and adhesion arrangement matter, as well as the visible sealant colour. This is not a universal joint-size instruction: the chosen detail must address the actual materials and movement.
Ask the contractor to name the sealant or profile and show its selected detail before tiling. A promise to “grout everything neatly” does not explain how a required movement junction will work. Conversely, merely naming silicone does not resolve compatibility, joint preparation or the detail behind it.
4B. Inspect an actual cabinet/end-panel interface
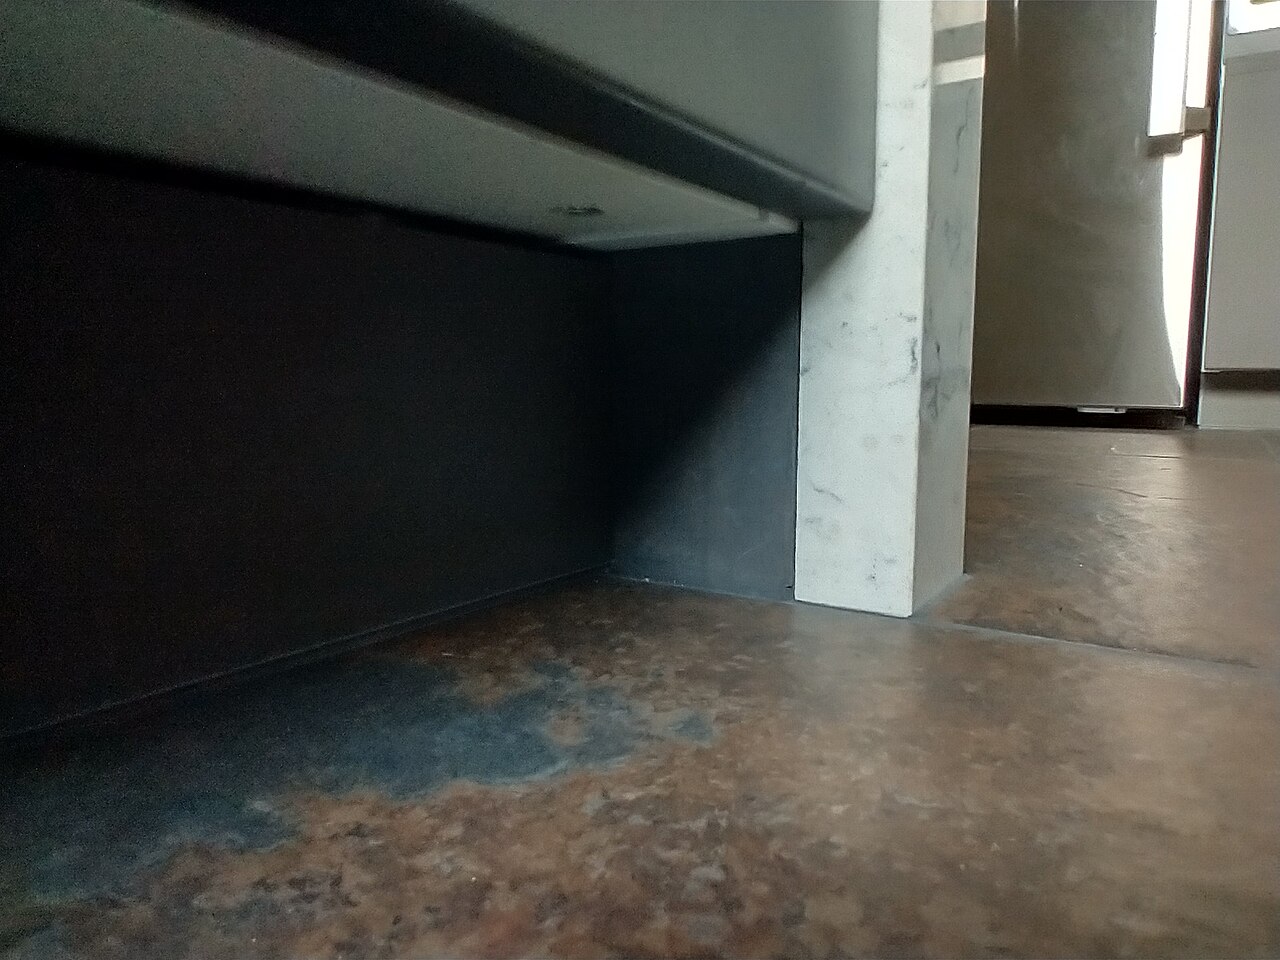
The low viewpoint makes the end-panel-to-floor relationship visible. It helps you ask whether a decorative end panel, plinth and finished-floor junction are included and who coordinates them. It does not establish concealed support, joint performance or installation quality. An end panel can be a separately priced fabrication item even when the proposal’s headline area describes only the horizontal top.
5. Review the sink area and service access
The sink area deserves its own detail discussion. Ask how the selected sink is supported, how the worktop cut-out is treated and how the connection between sink and worktop is completed. The answer needs the actual sink and worktop instructions.
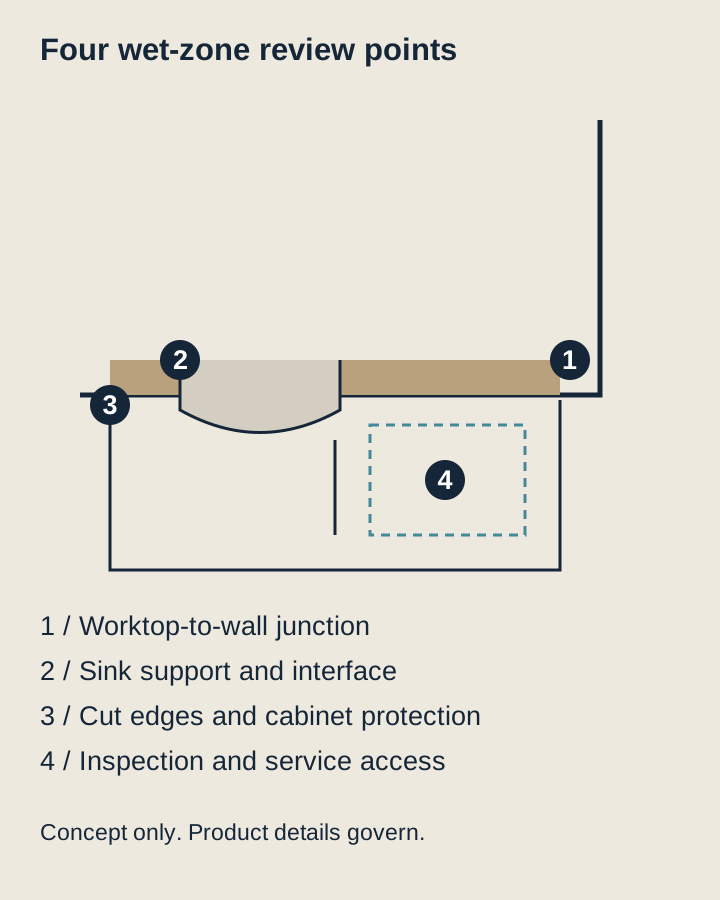
Under the sink, request a layout that identifies shut-off points, waste connections and the access needed to inspect or service them. Ask how storage fittings interact with those connections. IKEA’s installation guidance illustrates why pipe positions and cabinet interiors must be coordinated; its worktop instructions also address the sink cut-out. [K01]
For the dishwasher, ask the installer to show the connection and removal approach using the exact appliance instructions. Keep the answer in the project record rather than assuming that a finished front panel guarantees service access.
Practical question: If a connection needs attention later, what can be opened or removed without damaging the finished kitchen?
Concept study · Closer look: top-mounted sink on a laminate worktop
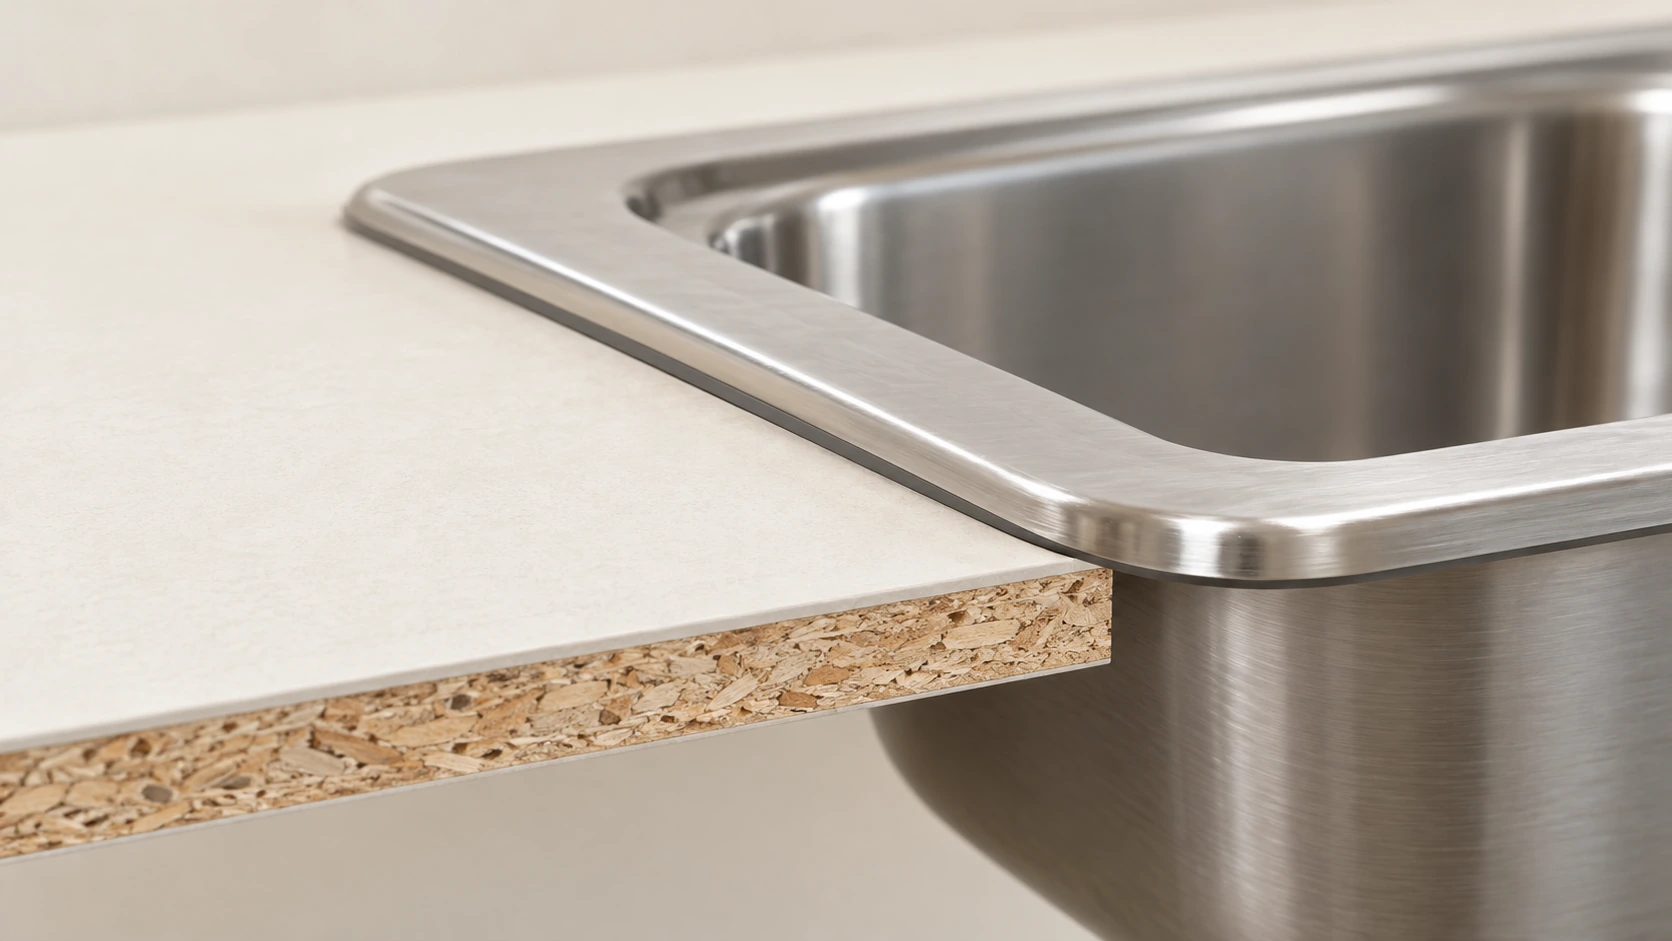
Ask how the cut edge, rim interface and support are completed under the exact product instructions. An undermounted sink in stone or composite needs its own detail; do not reuse this sample as that installation.
Actual reference: inspect the opening before the sink is in place
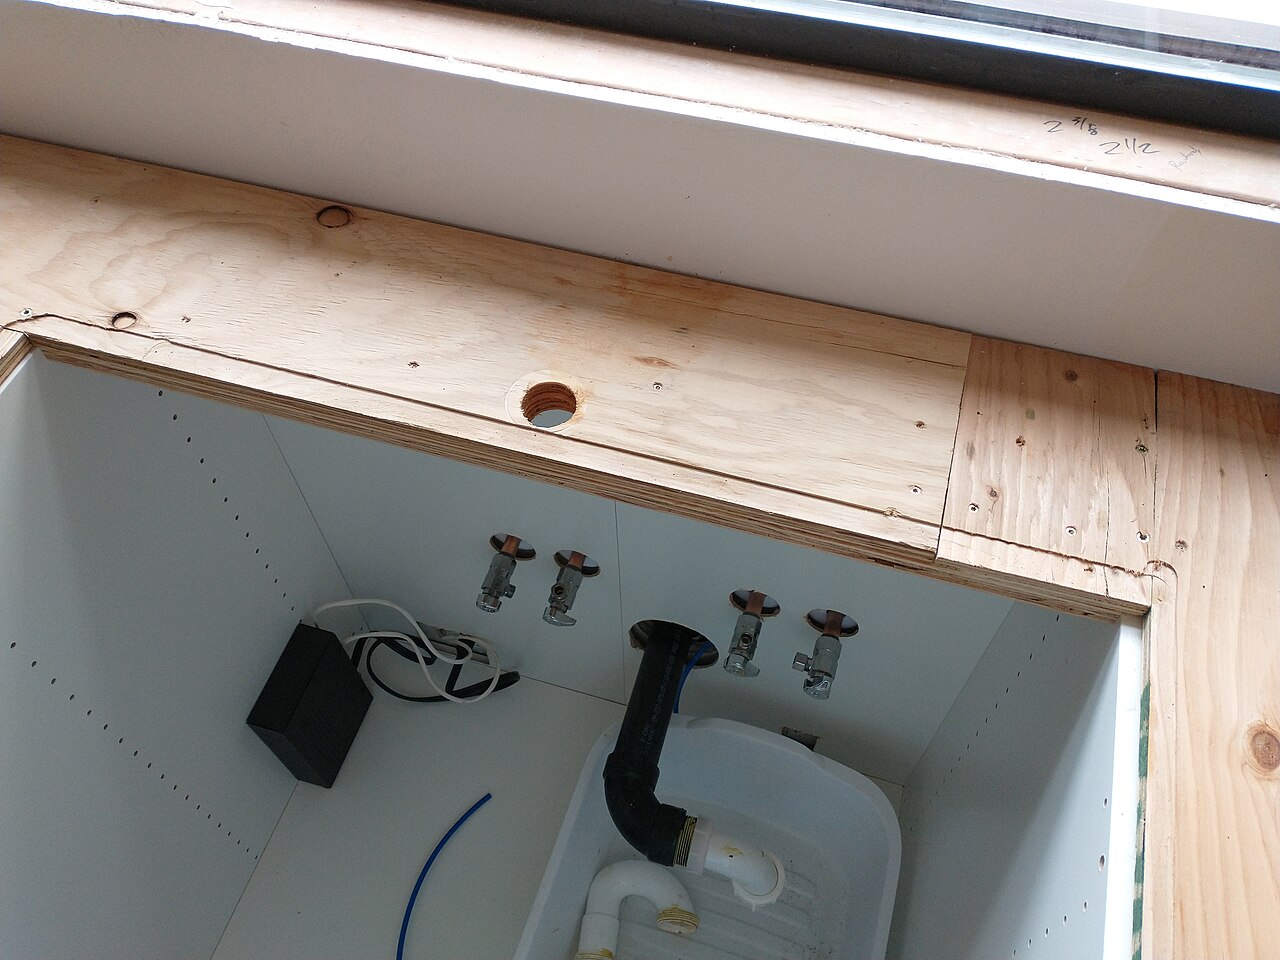
The opening exposes a stage the finished kitchen will conceal: the cut surface and routes into the cabinet. Photograph the actual preparation and ask how the selected sink, worktop, support and service access will be completed. The image does not prove support adequacy, edge protection, final plumbing or electrical compliance. Do not copy its unfinished arrangement as an installation instruction.
Ask before concealment: which product instructions and drawings define the sink support and cut-out, who records acceptance, and which service parts remain accessible?
03 / Services, sequence & proposalVentilation, appliances, hold points and the handover file.
6. Plan ventilation before approving the cabinetry
EPA explains that cooking itself can generate indoor particles and recommends using a range hood, preferably one that exhausts outdoors. [K05] Identify the proposed appliance, hood and actual air route while the layout is still being coordinated.
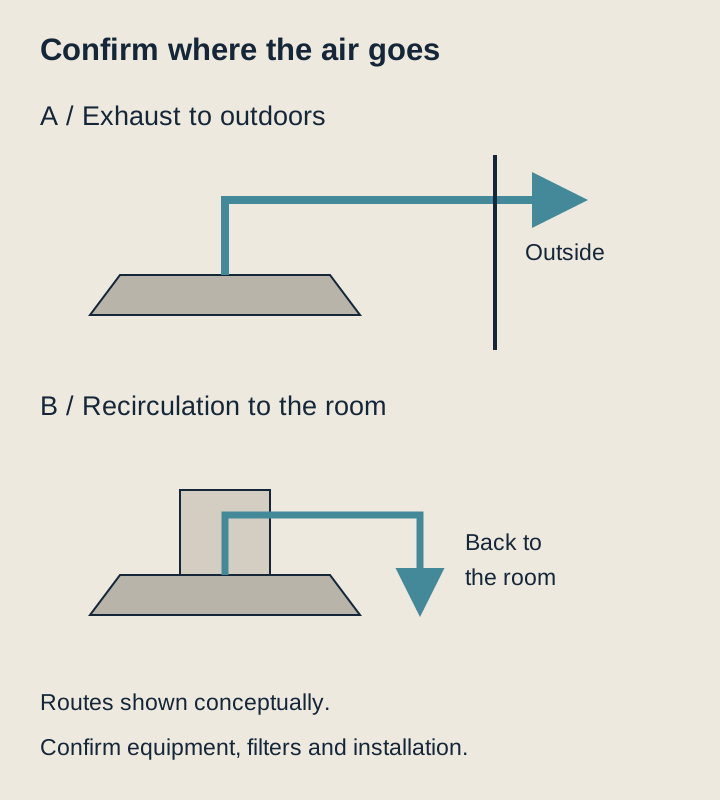
IKEA describes extraction and recirculation as different installation options for its hoods. [K01] Ask which arrangement is proposed and what the equipment documentation says about installation and filter maintenance. Do not describe a recirculating arrangement as an outdoor exhaust.
EPA’s guidance also connects selection to airflow and noise, and notes that high exhaust rates can require professional attention to replacement air and combustion-appliance interactions. [K05, K06] A bigger airflow number alone does not settle the design. Confirm the whole arrangement for the home.
For everyday use, EPA advises operating the hood while cooking, using rear burners when practical and maintaining the grease filter. [K07] Keep the exact appliance and filter-care instructions in the handover folder.
7. Coordinate appliances, lighting and services
Before ordering cabinetry, collect the model numbers and current installation information for appliances that affect openings, clearances, ventilation or access. Ask who checks that the electrical, plumbing and any gas work match the selected equipment and the applicable local requirements.
Use a coordinated drawing to record:
- Appliance openings and door movements.
- Required service locations and access points.
- Worktop cut-outs and fabricator responsibilities.
- The hood arrangement and its route.
- Lighting over the surfaces actually used for preparation.
- Switches and controls in relation to furniture and finishes.
These are coordination items, not a wiring or plumbing design. This article does not set circuit sizes, outlet spacing, gas connections, hood mounting heights or local permit rules. Those need the exact installation and jurisdiction.
8. Agree the sequence and the hold points
This is a DLG project-coordination framework. The selected cabinet, appliance and surface instructions determine the actual installation sequence.
| Stage | Record or agree | Useful hold point |
|---|---|---|
| Survey and scope | Existing conditions; retain, replace and investigate lists | Resolve the items that affect feasibility or price |
| Coordinated selections | Appliances, cabinetry, worktop, sink, hood and finishes | Confirm that drawings and quotes use the same selections |
| Preparation and service work | Responsibilities, access and relevant inspections | Check readiness before work is concealed |
| Cabinets and supports | The selected installation method and supporting construction | Confirm dimensions and readiness for worktop measurement |
| Worktop and fittings | Templating, cut-outs, installation and connection responsibilities | Review completion against the agreed details |
| Commissioning and handover | Checks, adjustments, care information and outstanding items | Record what is complete and what remains open |
Photograph agreed stages before concealment and retain the product references. Ask the contractor to document variations when a hidden condition changes the work. A final photograph is useful for the finish record, but does not replace installation or inspection records.
9. Compare quotations on the same basis
Give each bidder the same layout, selected products and assumptions. Then ask them to distinguish included work from allowances and exclusions.
| Quote item | Clarification to request |
|---|---|
| Removal and disposal | What is removed, retained, protected and disposed of? |
| Preparation | Which wall, floor and supporting-condition assumptions are included? |
| Cabinet package | Are hardware, fillers, end panels and installation included? |
| Worktop | Are measurement, fabrication, cut-outs and fitting all included? |
| Services and ventilation | Which connections, equipment and route are included? |
| Finishing and handover | Are adjustments, completion checks and records included? |
| Variations | How are concealed conditions, changes and approvals documented? |
This comparison helps reveal differences in scope. It does not establish a market price or predict the return on a renovation. Those questions require dated local costs and a separate property analysis.
A comparable-scope exercise for choosing the firm
These are fictional proposal descriptions, not actual firms or quotations.
| Item | Short offer | Evidence-rich offer | What to clarify |
|---|---|---|---|
| Cabinets | “Supply and fit kitchen” | Bodies/fronts/hardware, fillers, end panels and fitting named | Does each bidder include the same package? |
| Worktop | “Quartz included” | Product/thickness, measured-area basis, seams, cut-outs and end panels listed | Which fabrication and installation work is included? |
| Backsplash | “Tile wall” | Net area, layout/returns, support, bonding and junction detail stated | Are preparation and movement details priced? |
| Services | “Connect appliances” | Models, trade responsibilities, access and exhaust route identified | Which inspections and commissioning records apply? |
| Change | “Extra work if needed” | Written investigation allowances and change-approval procedure | What needs approval before extra cost is incurred? |
An itemized offer is easier to compare, but the firm’s competence still needs suitable references and applicable credential/insurance checks. Ask a short-offer bidder to provide the missing scope. Do not assume a premium material name proves better workmanship.
At handover, use the same drawing: operate doors/drawers, review agreed edge and seam appearance, confirm service access, identify product/care records and record remaining work. Agree any functional checks with the responsible trades. A finished photo is one piece of the handover, not its complete evidence.
10. Build a care and handover folder
Request the cabinet and hardware references, appliance manuals, worktop care sheet, sink and faucet information, hood/filter instructions and installation or inspection records. Ask which spare finish materials are useful and how replacements are identified.
Formica’s laminate care, Caesarstone’s surface care and the Natural Stone Institute’s guidance illustrate why one cleaning recipe should not be applied to every finish. [K02–K04] Keep the care advice tied to the selected product. Repeated moisture damage or a recurring leak needs investigation, not just a new cosmetic surface.
11. Questions to take to the project team
- What is staying, what is changing and what still needs investigation?
- Do the layout and appliance information show how the room will be used?
- What exactly are the cabinet body, fronts, hardware and support system?
- How are sink edges, worktop seams and service access resolved?
- Where does the hood discharge, and who confirms the ventilation design?
- Who checks openings, connections and clearances before orders are final?
- What must be reviewed before concealment or fabrication?
- How will allowances and variations be agreed?
- What records and care instructions will be provided at handover?
Take the guide into a proposal review
Use the Kitchen, Bathroom & Floors proposal worksheet to record three firms’ answers to the same scope questions, identify evidence needed before covering work, and keep unresolved items with their responsible person. Notes can be downloaded and the selected area printed. The worksheet is a planning record, not a firm rating or a design approval.
Sources, assumptions and review dates
Sources and scope
Original sources checked 19 October 2026; K08 and K10 reviewed 20 October 2026; the sink-preparation photograph reviewed 21 October 2026. EPA provides public indoor-air guidance. Manufacturer pages describe their own products and do not establish a neutral brand ranking. Regional manufacturer examples are used for the named point, not as local U.S. code or a purchasing recommendation. No manufacturer artwork has been copied; the separately credited licensed photographs are included unchanged.
K01 — IKEA, Netherlands: Kitchen installation guide. Room checks, fixing, fillers, service coordination and hood modes. System-specific dimensions are not adopted here.
K02 — Formica, U.S.: Care and maintenance. Laminate seams and cleaning considerations.
K03 — Caesarstone, Canada: Fusion, mineral and quartz surface care. Heat and cutting protection for the covered surfaces; verify the actual product and market instructions.
K04 — Natural Stone Institute: Care and cleaning. Stone identification and care compatibility.
K05 — US EPA: Sources of indoor particulate matter. Cooking emissions and hood selection/use.
K06 — US EPA: Remodeling and indoor air quality. Kitchen ventilation and air-sealing coordination.
K07 — US EPA: Improving indoor air quality while cooking. Everyday use and maintenance advice.
K08 — LATICRETE: TDS 256: movement joints. Changes of plane and tile meeting countertops; no generic joint dimensions adopted here.
K09 — Schluter: DILEX-AHK. U.S. product description reviewed 29 October 2026 through web retrieval; direct automated access returned 403. Limited-movement cove-profile example, not a universal movement-joint or waterproofing detail.
K10 — Stilfehler: California Kitchen Countertop Details 6, 29 February 2024, CC BY-SA 4.0. Actual source-labelled interface photograph; no endorsement.
