
DLG GROUP · INSIGHTS / LANDSCAPE & EXTERIOR
Design the boundary, not just the panel
Start with boundary, privacy, access and water flow. Compare complete fence systems, including posts, ground connections, slopes and gates, before choosing the visible panel.

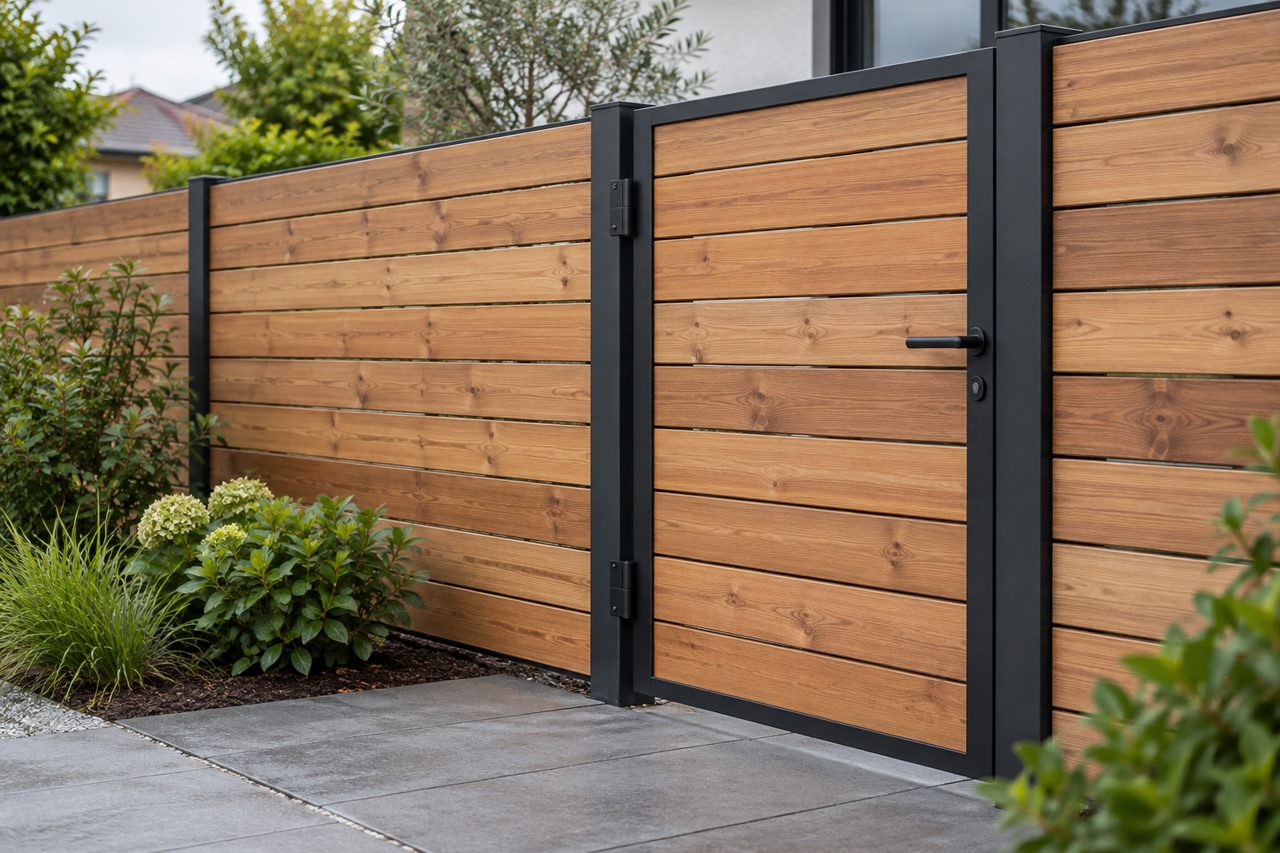
Optional architectural concept illustration
01 / Boundary, material & support
A garden fence shapes privacy, movement and the view from both sides. Its quality also depends on less visible decisions: where the boundary lies, how the posts are supported, how the gate moves and where water goes.
This companion to the Landscape, Exterior & Water guide develops material choice, connections, slopes, gates, local review and handover. It is a project-brief framework, not a surveyed boundary or an installation specification. Pool barriers, fall-protection guards and powered gates require separate assessment.
1. Define the boundary’s job
Describe the required experience before selecting a finish. A screen behind a seat may need only a short area of privacy; a property boundary has a different length, context and responsibility. A visual screen is not automatically a security system or a noise barrier.
On a narrow screen, scroll the comparison table horizontally.
| Priority | Question to answer | Evidence to request |
|---|---|---|
| Privacy | From which viewing position and in which season? | Views from both sides, gaps and proposed height |
| Access | Who passes through, carrying what equipment? | Gate opening, swing/slide space, approach levels and clear route |
| Appearance | Which face, joints and repair method will remain visible? | Elevation, physical sample and a representative junction |
| Durability | Which members touch ground or receive regular water? | Exact product/exposure documents and maintenance plan |
| Boundary coordination | What land, easement or drainage function is affected? | Survey, ownership records and authority response |
Keep the actual boundary, proposed fence line and construction-access route distinct on the plan. An old fence or hedge is an investigation clue, not proof of the legal boundary. Resolve uncertainty with the appropriate property/survey professional before committing to work.
2. Compare materials as systems
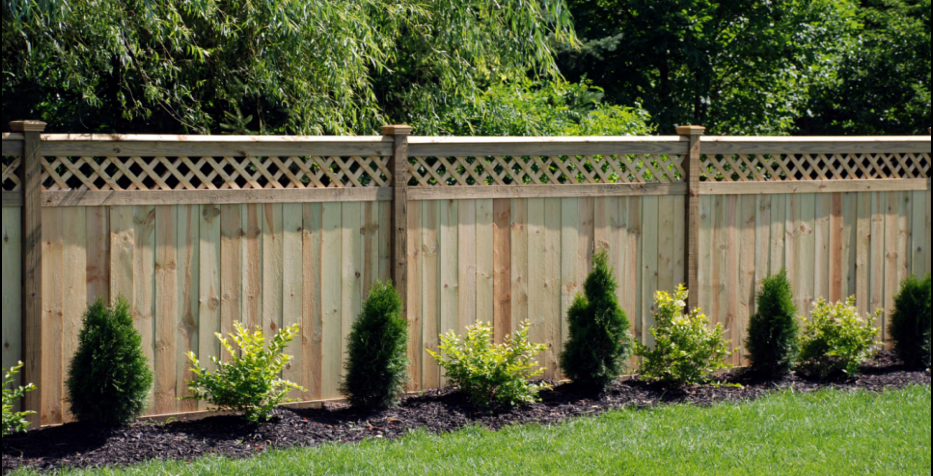
Use the real reference photograph at the top alongside the review questions below.
The table sets comparison questions, not universal rankings. Price, life span, coating performance and wind capacity require evidence for the selected system and location.
On a narrow screen, scroll the comparison table horizontally.
| Direction | Character to explore | Detail to resolve |
|---|---|---|
| Horizontal timber slats | Grain, board rhythm, open or screened views | Exposure, board support, movement, fastening, end treatment and replaceability |
| Aluminum panels or slats | Slender frame and consistent finish | Profile, coating, connections, cut-edge care and supported configuration |
| Composite infill with a compatible frame | Board appearance and modular assembly | Approved frame/rails, expansion allowance, span, support and care |
| Perforated or patterned metal screen | Filtered views and repeated pattern | Panel thickness/support, edges, fixings, coating and wind design |
| Masonry base with infill | A more substantial edge and separate panel above | Foundation, structural role, movement, water passages and access |
Request a sample large enough to assess the actual face, edge, joint and finish. Ask how colour or surface changes are described by the supplier, how a damaged board is replaced, and what maintenance is required to retain the intended appearance.
For timber, distinguish boards, rails and posts. The American Wood Protection Association describes use categories for preservative-treated wood and the information on end tags; above-ground and ground-contact uses are not the same category. [FN05] Identify the actual product and exposure rather than accept “treated” as a complete specification. This does not imply that every wood component must use the same species or treatment.
Reference photograph: timber boards, posts and a separate lattice top
Read the lower boards, posts and open top as separate components. A lattice top changes the view through the boundary; it does not prove wind capacity or concealed support. This vertical-board reference is not the horizontal system in the concept or the selected Horizons document below. The earlier Real Cedar photograph is replaced in this revision; its guidance remains an external reading reference. [FN06]
3. Make the post and ground connection explicit
Ask the designer to identify which component carries loads, which supports the infill and which part is decorative. A hollow cover, a structural post and an anchor arrangement may have different roles even when their visible faces look similar.
Embedded and surface-mounted systems require their own product and structural details. An existing patio slab or retaining-wall cap is not proven suitable for fence loads simply because it can be drilled. Confirm the substrate, edge conditions and any required structural investigation before proposing an anchor layout.
Request the selected detail for foundation/post support, local ground conditions, frost/wind considerations, corrosion compatibility and the intended panel/gate configuration. Do not copy a footing depth or post spacing from a photograph or another manufacturer’s system.
Look closer: panel, connection, post and support
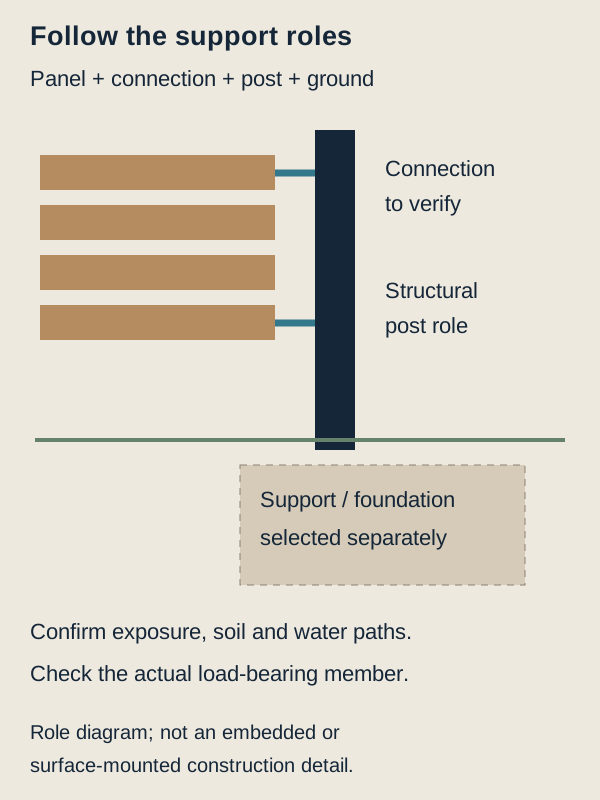
At the bottom edge, coordinate the finished soil, mulch, paving and intended opening. Ask how cleaning and replacement remain possible and whether later planting or soil additions would change exposure or obstruct the gap. Any gap must also suit the fence’s actual function; a pool or other regulated barrier cannot be assessed as ordinary garden screening.
02 / Slope, quantities & the gate
4. Resolve slopes and water paths together
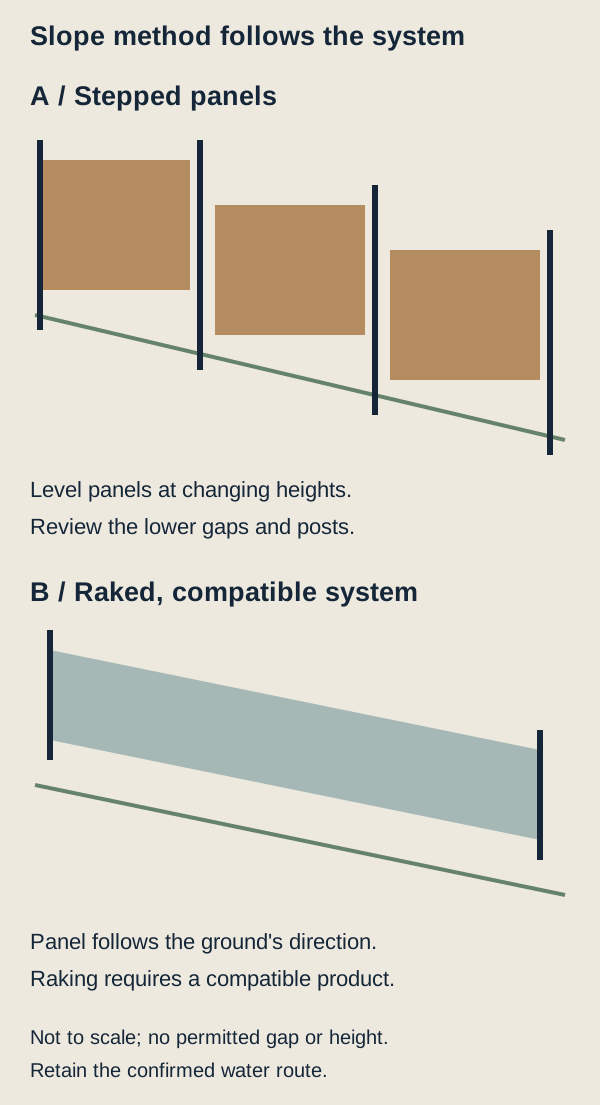
Show the surveyed ground line and proposed panel arrangement in elevation. A stepped arrangement keeps panels level at different heights. A raked arrangement follows the slope using a system designed for that movement. Neither can be assumed possible from panel appearance alone.
Two real manufacturer references demonstrate the difference:
- The Trex Horizons horizontal-system guide describes stepping its panels on sloping ground and notes resulting lower gaps and post considerations. It also supplies system-specific movement and installation details. [FN07]
- The Fortress Athens aluminum-fence guide describes raking panels in a particular direction and a specific post/rail connection and installation sequence. [FN08]
These are examples of different systems, not interchangeable methods or product endorsements. The cited guides’ dimensions and component details are not transferred into the generic drawings here.
Trace water before specifying a continuous plinth, closely fitted bottom board or wall. Record where surface water currently crosses the proposed line and how the new work affects it. Any drainage opening, crossing or outlet needs a coordinated design and receiving route, not an improvised hole added at the end. Cross-reference the building-perimeter and surface-drainage modules where the fence meets those systems.
4A. Read the dimensions in a selected horizontal system
The Trex Horizons guide distinguishes a maximum 97 in post-center layout from an ideal 92 in between posts. Those labels describe different measurement references. For its pickets, the guide calls for a cut length 3/8 in shorter than the opening between vertical rails; its drawing shows 3/16 in at each side. [FN07] That illustrates why a nominal panel width, a clear opening and a post-center dimension cannot be substituted for one another.
Ask the firm to identify the measurement reference on its elevation and the actual component schedule. These are Horizons document examples, not universal post spacing or timber movement allowances. The guide also requires stepping on slopes; our generic raked illustration does not make a Horizons panel rackable. [FN07]
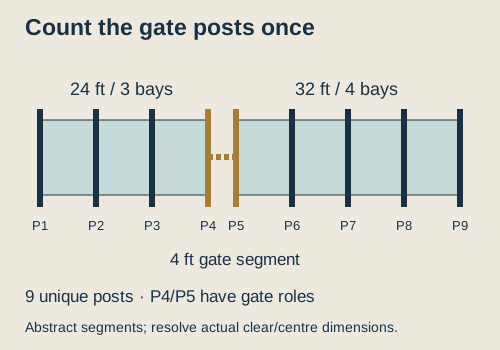
4B. Worked fence count: include the gate-support posts once
Assume a straight 60 ft layout composed of a 24 ft panel run, a 4 ft gate opening and a 32 ft panel run. To make the arithmetic simple, assume 8 ft panel bays for this exercise. These are abstract layout segments, not a fit check for the Horizons dimensions above. Actual post widths and the distinction between clear and center dimensions must be resolved in a real drawing.
On a narrow screen, scroll the comparison table horizontally.
| Segment | Assumed bays | Unique post count |
|---|---|---|
| 24 ft left run | 24 ÷ 8 = 3 | 4 |
| 4 ft gate opening | Separate gate assembly | The two adjacent run-end posts serve the gate; not two more posts |
| 32 ft right run | 32 ÷ 8 = 4 | 5 |
| Total | 7 panel bays + 1 gate | 9 unique posts |
Two of the nine posts have gate support/latch roles and may need different components and supports. A quote listing seven panels and eight ordinary posts may be assuming an uninterrupted line; ask for the gate and ends on the drawing. A quote listing eleven posts may be counting gate posts twice, or it may include a separate legitimate configuration. Resolve the actual layout rather than declare either quote wrong from a number alone.
No corner, return, slope, wall attachment or additional gate is included in this exercise. Supports, excavation and post lengths are not calculated. Add those from the surveyed line and selected system, not from an average price per panel.
5. Treat the gate as its own assembly
Mark the required usable opening, gate leaf, supporting and latch posts, approach, swing or slide area and changing ground levels. The nominal gate size is not automatically the usable opening or the post-to-post dimension.
Ask the provider to confirm the selected hinge/latch positions, supporting-post requirements, bottom clearance, stops, alignment and adjustment method. Check the complete movement path after the adjoining paving is finished. A gate that opens on a flat drawing may bind on rising ground.
Specify intended operation and maintenance: how the latch is reached, how access is controlled, what can be adjusted and which parts can be replaced. The Fortress Athens example gives its own gate/hardware arrangement; it does not validate the illustrated generic gate. [FN08]
If automation is proposed, create a separate assessment for the actual operator, gate, safety provisions, power, manual release and maintenance. The current package neither selects a motor nor provides wiring or an automated-gate installation method.
03 / Local review, sequence & quote
6. Confirm local review before ordering
Use the actual municipality and property classification, including historic, association and other applicable constraints. Check both fence and gate. Do not assume a building-permit exemption removes zoning, boundary, easement or site responsibilities.
On a narrow screen, scroll the comparison table horizontally.
| Local reference | Narrow verified context | Project follow-up |
|---|---|---|
| Fairfax County, Virginia | County zoning guidance distinguishes yards and fence/wall location and height; general permit guidance retains additional-approval checks. [FN01–02] | Actual yard classification, corner visibility, easements, pool function and scope |
| City of Atlanta, Georgia | ATL311 publishes fence-permit guidance, including replacement scope and historic/landmark review. Its submission-channel wording needs confirmation for the actual application. [FN03] | Confirm current route with the Office of Buildings and applicable zoning/design review |
| City of Boston, Massachusetts | The city’s permitting portal is an official starting point for identifying the relevant review. [FN04] | Fence-specific permission/height and any historic/site constraints remain unconfirmed in this package |
The Boston entry is a contact route, not a verified fence exemption. These cities/counties are examples, not rules for their entire metropolitan areas. No universal height, setback, fee or turnaround time is asserted.
Before excavation, follow the applicable notification/response requirements and account for private services. Virginia 811 explains that it notifies participating utility owners; private-line owners must arrange the location of their own lines. [FN09] Do not treat a fence-post hole as exempt from investigation because it is small.
Prepare the boundary/site plan, elevations with existing/proposed ground, materials, gate movement, support details appropriate to the scope, and authority/association correspondence. The authority determines the actual submission requirements.
7. Sequence the work and record concealed details
- Investigate and agree the brief. Confirm ownership/boundary information, existing condition, function, access and water paths.
- Resolve the system. Select compatible panels, posts, supports, corners, slope method and gate components; review a sample junction.
- Confirm approvals and access. Establish actual local requirements, neighbour/access arrangements and utility responsibilities before digging or non-returnable orders.
- Set out and inspect. Check the real ground profile, gate approach, line and openings against the accepted design. Resolve unexpected services or soil before proceeding.
- Construct to the selected details. Follow the applicable manufacturer’s sequence and professional requirements. Record support and connection evidence before concealment and observe required inspections/cure stages.
- Complete and test. Check the full gate movement/latch, panel alignment and fixings, finishing, access and water-route continuity. Record defects and corrections.
- Hand over. Provide as-built locations, selected-product documents, warranty/care requirements, hardware adjustment information and responsibility for recurring checks.
This is a coordination sequence, not a universal installation recipe. The Trex and Fortress guides show why post/panel order and connection methods need to come from the chosen system.
8. Compare the full quote
Separate removal/disposal, survey/design, applications, access/ground works, supports, panels, corners/ends, gates/hardware, finishing and reinstatement. Identify which quantities are measured, which are allowances and what changes if soil, services or the boundary differ from assumptions.
Include maintenance and replacement access. Ask who returns to adjust the gate, what the warranty covers and excludes, and which cleaning or coating products the manufacturer permits. “Composite,” “aluminum” and “cedar” are material labels, not complete care instructions.
Use the companion detail-and-handover register to record the answers and unresolved items. No installed price, life-span promise, security performance, sound reduction or property-value increase is inferred from the concept or source photograph.
For a comparable bid, mark every unique post on the same drawing and list gate leaf/hardware, end/corner parts, support design, removals, finish, utility investigation and reinstatement separately. Agree adjustment and handover checks for the whole gate travel after paving. Itemization supports selection; it does not replace workmanship references and applicable credential checks.
Sources, assumptions and review dates
Sources and scope
Original sources checked 19 October 2026; FN07 and new FN10 reviewed 20 October 2026. Earlier local-rule entries keep their original scope and check date. Text and graphics are DLG editorial synthesis with source-specific examples; they are not a certification, product recommendation or property design.
- FN01 · Fairfax County, zoning questions. Fence/wall yard and location context. Open FN01 source
- FN02 · Fairfax County, permit requirements. Scope and additional-approval checks. Open FN02 source
- FN03 · City of Atlanta ATL311, Fence Permits. Local scope, historic context and application contact; conflicting submission-channel wording is not resolved by this article. Open FN03 source
- FN04 · City of Boston, permitting portal. Official starting route only, not fence-specific clearance. Open FN04 source
- FN05 · American Wood Protection Association, homeowner information. End tags and exposure/use-category distinctions; no preservative recipe adopted. Open FN05 source
- FN06 · Real Cedar / WRCLA, Prebuilt Fence Panels. External panel-quality/dimension reference only; previously embedded photograph removed in this revision. Open FN06 source
- FN07 · Trex Horizons, horizontal-system installation guide. Fifteen-page linked guide reviewed for slope, movement, components and sequence; Selected measurement-reference and picket-clearance passages rechecked for the named-system example; not a generic layout rule. Open FN07 source
- FN08 · Fortress Athens, residential fencing installation instructions. Ten-page guide reviewed for product-specific raking, connections and gate sequence. Open FN08 source
- FN09 · Virginia 811, excavator FAQ. Notification/private-location distinction. Timing wording is not reproduced; follow current applicable state/ticket instructions. Open FN09 source
Continue with Landscape, Exterior & Water for surface and building-perimeter drainage. Continue into the linked Fire Features and Aromatic Planting guides for their separate systems and review questions.
- FN10 · Privacy Fence, Wikimedia Commons. Actual vertical-board/lattice reference, 7 June 2009, uploader public-domain dedication. Image unchanged; no endorsement or concealed-assembly verification. Open FN10 source